|
I will go on record and say that originally, Stella had most likely the
worst pedal box in the history of TII ownership. It was
so rusty the pedals would not work properly. I knew that at some point in
the rebuild process I would make this as though it were brand new. It's not
hard, it just takes like everything else on this project persistence, cash
and a will to nip rust in the butt whenever you get the opportunity.
Many thanks here to Sherman Martinez, who about 2 years ago showed me a
rebuilt, powder coated pedal box. It knew then I was ready to hand him the
money to get me one done. It's sat in a box till now, and believe me I was
ready to do this. |
 |
|
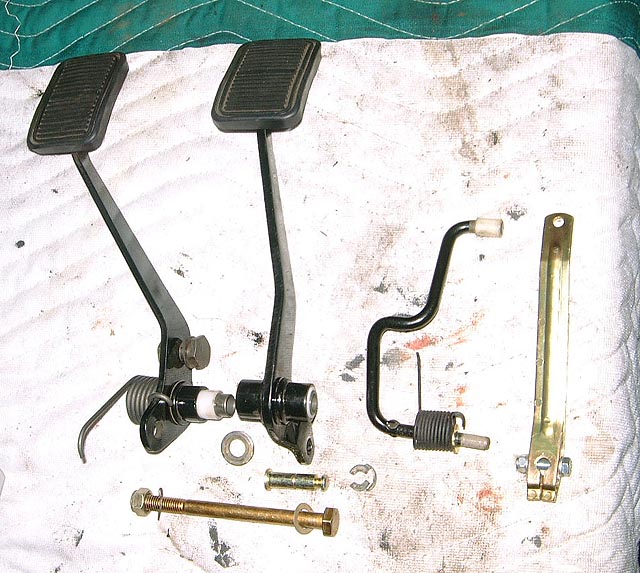
For clarity here are the innards. Most parts can be had new.
Bimmer Parts sells a kit with all the things you need. Check their website
for pricing, or call them. They're chip considering. The bolts and the
plated part on the right are not part of the kit. At some point, I will
create a parts listing of this stuff, I did when I was ordering, I just
didn't order them all together at once! |
 |
|
This is the TII gas pedal. It has a return spring which sits
outside the box and gets rusty. Put something on it like HHS-2000 from Wurth
for both lubricant and rust preventative. The plastic tip on the rod shown
below is the bearing that the gas pedal resides in as you press/depress the
gas pedal. |
 |
|
Note there is an inner sleeve for both pedals of white, then
the metal portion fits through the long bolt, along with springs or pins
depending on brakes or clutch. I used Wurth HHS 2000 lubricant on all these
bearing surfaces as it's waterproof and very slick, and it sprays on. |
 |
|
Installing the brake booster rod: This rod and many of the
parts are NLA on it, so recycle. The boots are as of this writing still
around new. This rod attaches to the brake pedal on the back side of
the alignment bolt. |
 |
|
Here's another view, as you would see from the driver's side
of the firewall in the cabin. |
 |
|
Slide the bolt through as shown. Note there is a washer that
goes between the clutch and brake pedals. The order in which I'm putting
these in is critical in the reassembly, so note these steps! |
 |
|
Now add on the clutch pedal, and it's spring. Note that the
clasp at the back goes towards the back of the pedal box. The bolt on the
clutch pedal here connects to the clutch slave cylinder which I will cover
next time we put all the guts together this connects to. |
 |
|
Another view for clarity. This should be ready to snug, but
not tighten up, the main bolt. That comes later. |
 |
|
Here is the bushing on the outside of the box. Install it. |
 |
| |
 |
|
Now slide the gas pedal rod in. Ad the spring around the rod
as shown. Keep the pedal rod pushed all the way so that the rod protrudes as
shown. You will need that to add the linkage rod adapter next. |
 |
|
The linkage rod adapter is held at attention by a spring.
I've substituted for corrosion reasons here a stainless steel nut with Nyloc
insert and bolt. |
 |
|
Now position the rod and the adapter bracket as shown. Snug
up, but don't completely tighten. That will be done later after we affix the
pedal box to the floor of the car. |
 |
|
Another view of the assembly. |
 |
|
Side view of the box. |
 |
|
As you push forward on the pedal, there should be firm
pressure from the spring. It should snap right back into place. If not,
ensure the spring is connected properly to the rod on the outside of the
pedal box. |
 |
|
Straight on view showing full throttle position. |
 |
|
Top down view of the assembly. |
 |
|
Ok, here's the overall box with the pedal pads attached. |
 |
|
There is more to add and connect, just not at this time. Set
the assembly aside and we will pull it out again when we're ready for the
brake booster. More next month!! |

