| OK,
here's a new subject for you: CV Joints. I've not seen
this covered before, so I felt like it was worthy of taking notes and good
photos to show what's involved. If you haven't looked under your car before,
there is one of these attached to each side of the rear suspension. One end
bolts to the differential, the other to the rear stub axle. The rubber boot
contains the CV or Constant Velocity joint which can flex in two different
directions at once depending on the position of the rear wheel at that
moment. In essence, it's part of the magic of a 2002 - it's the link between
the engine and the wheels on an independent rear suspension as in all modern
BMWs since the Neu Klasse period cars were introduced. Here below is the
before and after of how most of these items look after 28 years. Depending
on where you live, and what time of year you drive, these could be like this
in a couple of years. They usually don't go bad, but need TLC. You
simply buy the CV Joint Boot kit (4 needed, 12-20$ each) from a parts house
and then follow my directions to get you back in the saddle again. Note: I'm
making the assumption you know how to get them off the car before we start.
I'll document the installation steps later as the rest of the suspension is
done. |
 |
|
Once you get them off, you want to inspect the insides by
popping off the cover with a flat bladed screwdriver. Here is one with and
without the top covers. |
 |
|
Ok, you will need to remove the bolts carefully and place
them in solvent. I use basic Kerosene over night as solvent. Get some of the
metal bristle tooth brushes available at auto parts stores to clean the crud
off. |
 |
|
You will have a set of three like this for each end of the
half shaft. If they are gold, as these, they are original. If black, they
are the hardened replacement bolts. |
 |
|
Next, remove the straps holding the boot on. Some are screw
type, some are just straps. Either way, discard them as they are no good
anymore being on the car for so long. The boots crack with age over time. |
 |
|
Using a sharp knife, such as an Exacto, cut off the boot. |
 |
|
Wearing good gloves, because this is a Moly grease and it
gets into everything, pull off the boot. |
 |
|
Ok, here's an overview of the business end of the CV Joint.
Note the yellow lines, as if your unit comes apart, you will need to
carefully reassemble it (ask me how I know). In order to assemble the ball
bearings one at time, you will need to first align the spider and the ball
bearing race exactly as shown in this picture. Then you rock the ball
bearing race back and forth, one at a time adding the ball bearings back
until complete. This may take you a couple of times to get the hang of it,
but it's like a Rubik's cube puzzle. |
 |
|
Inside is a retaining clip. Use a screwdriver or circlip type
pliers to remove this. I've propped it up here for clarity to show you how
small it really is. |
 |
|
Ok, take it off and place it away until you are ready to
reassemble. |
 |
|
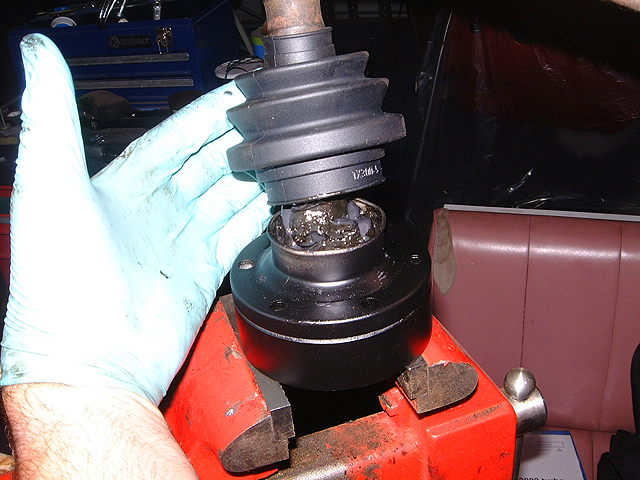
In a vice (if you're lucky) or a press, you will need to push
the shaft out of the CV joint assembly. I used a punch in that recessed area
of the shaft to knock it on through so it could be completely cleaned. |
 |
|
After the assembly comes loose, there is a cupped washer here
on the shaft. Please note it points upwards toward the CV joint and goes on
first before reassembly of the CV joint itself. |
 |
|
Don't forget this washer. It's unique to all the parts you
are removing. |
 |
Ok, at this point you start the cleaning process as follows:
HALF SHAFTS: With either a wire wheel or bead blaster, remove all corrosion,
paint and seal up from future corrosion as desired.
CV JOINT: Use a strong solvent. I use CRC BrakeKleen2 (green can) to rapidly
remove the old moly grease over a plastic bag lined trash bag, along with
compressed air to get it all out.
Well, It looks like this when clean. Note the position of
the ball bearings here after reassembly and refer to the previous picture
for that lineup. Note that this is the end that faces out towards either the
stub axle or the differential. |
 |
|
This is the side that faces inward, toward the half shaft
itself. Spray paint these with either Krylon or similar in a satin black
finish. I used a Dremel with a wire wheel to remove all the paint. |
 |
|
Ok, now load up the joint with the new CV joint moly grease,
loading up both front and back sides of the bearings. It should look like
this when you're ready to start. |
 |
|
Once lubed up, slide the rubber boot onto the shaft. Getting
it over the big wide mouth part is not hard, just takes some practice on the
first one, the rest are easy once you get the hang of it. Add the stainless
steel hose clamps provided in the CV Joint boot kit after you've positioned
the boot properly. |
 |
|
Once side down, one to go. |
 |
|
Repeat the process on all 4 ends. I chose to rotate the
location of the stainless steel clamps in order to not put all the tightness
in the same location. Repeat the installation
process. Put the cupped washer back on and then pound the CV joint back onto
the half shaft. Add the retainer clip and put the dust cover back on with a
small hammer. |
 |
|
Set these aside until the suspension is ready to accept them.
Admire your work... drink a beer! You just saved yourself about $400 from
the price of a set of new ones! |

