|
The suspension in the front is built of stock parts, but
added the ST Sway bars and Eibach Pro springs and Bilstein Sport Shocks in
front. I used original good condition TII struts, but stripped and powder
coated them for look and making them easy to clean. The factory uses a black
paint that comes off easily and hold dirt. |
 |
|
These are the finished result of the powder coating of the
struts. The were done by 2002 Haus's powder coating service and they turned
out great. This is a semi gloss black. |
 |
|
These are the spring tops - better than new I think.
|
 |
|
A view of the spring perches. This area can hold water if not
taken care of, the finish will make water roll right off. |
 |
|
The bottoms are not coated as this is covered up in normal
use. I ran a tap through these holes to make sure they snug up before they
go back together. |
 |
|
Another view of the spring perch with the drain hole. |
 |
|
Your fronts look like this out of the box. That strap keeps
the length of the shock down until installation. |
 |
|
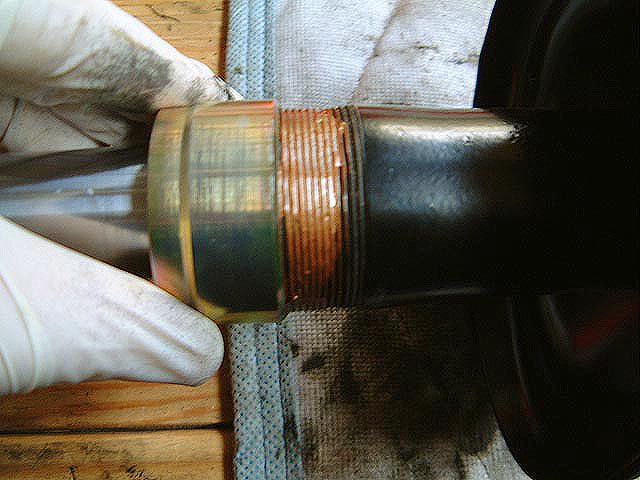
This wrench, supplied with the Bilsteins, tightens the
special collar on the struts themselves. |
 |
|
If you have ever taken one of these apart, you know it takes
a damn pipe wrench to get the original BOGEs off so I use anti seize
compound from LubriMoly first. |
 |
|
The wrench goes on, tighten 140 Newton Meters with
this weird tool. That amount is stamped on the tool. |
 |
|
And when you're done it looks nice like that. |
 |
|
Use a tap to clean the powder coating out of the threads. It
is about 1/16" deep in every hole. |
 |
|
They should all look nice like this when you're done. I use
Marvel Mystery oil to cut with the tap. |
 |
|
Ok, get out your springs at this point, and zip tie the
rubber spring perch pads. These will move if you are on a hoist or jack and
the wheels are unsuspended and they would be a pain to re-seat each time. Do
the tops and the bottoms. |
 |
|
Now the tops go on and into place. |
 |
|
And they are ready to go. |
 |
|
Back in April, I bead blasted these at 2002 Haus and watched
their powder coating process in action, so I am rather proud of my work on
these. I used stainless nuts for the two bottom screws that hold the backing
plates onto the struts. I decided to use Silver to make the brake parts
stand out when you see them through the wheel. I have only the bearings to
install now for the front wheels to go on, and those are 77 320i hubs. |
 |
|
The back view, waiting for the calipers now, which are the 5
Series ATE units with vented Brembo rotors. |
 |
|
These are new control arms with the bushes already pressed
in. |
 |
|
This is the ball joint. I have used Grade 10.9 hardened bolts
with nyloc inserts to hold them to the arm. |
 |
|
The flip side, with lock washers installed for redundancy of
pressure. This shot taken before I tightened the nuts up firmly. The top nut
was tightened in place with an 1/2 impact wrench. |
 |
|
Ok, underneath you have a new big bolt that holds one end of
the control arm onto the sub frame, and the other end goes into the
stabilizer bar connected to the front compliance bushing. There are lock
nuts on the back of the big gold bolts here, but you wait until the car is
loaded with weight before tightening them. |
 |
|
Ok both sides go in. This will hold me for now go make the
car where I can roll it around on it's wheels. |
 |
|
But I discovered that I am short the set of special washers
that go on either side of the control arms - and of course, they are NLA, so
I'm going to have to find some new ones or part out some old ones and get
them refinished before we make Stella road worthy. You can see the strut
bottoms now, waiting for the center track rod and tie rod ends to make it
complete. |
 |
|
A view of the passenger side, looking down. |
| |
| OK, after
1.5 years of disassembled life, Stella's about ready for wheels. Let's hope
the weather in January is warmer than normal. |
| |
| This is
part 2 of 2, Part 1-> Keyed and Wired! |

